Burn Injuries at Home: Immediate Care Tips and Signs You Should See a Doctor
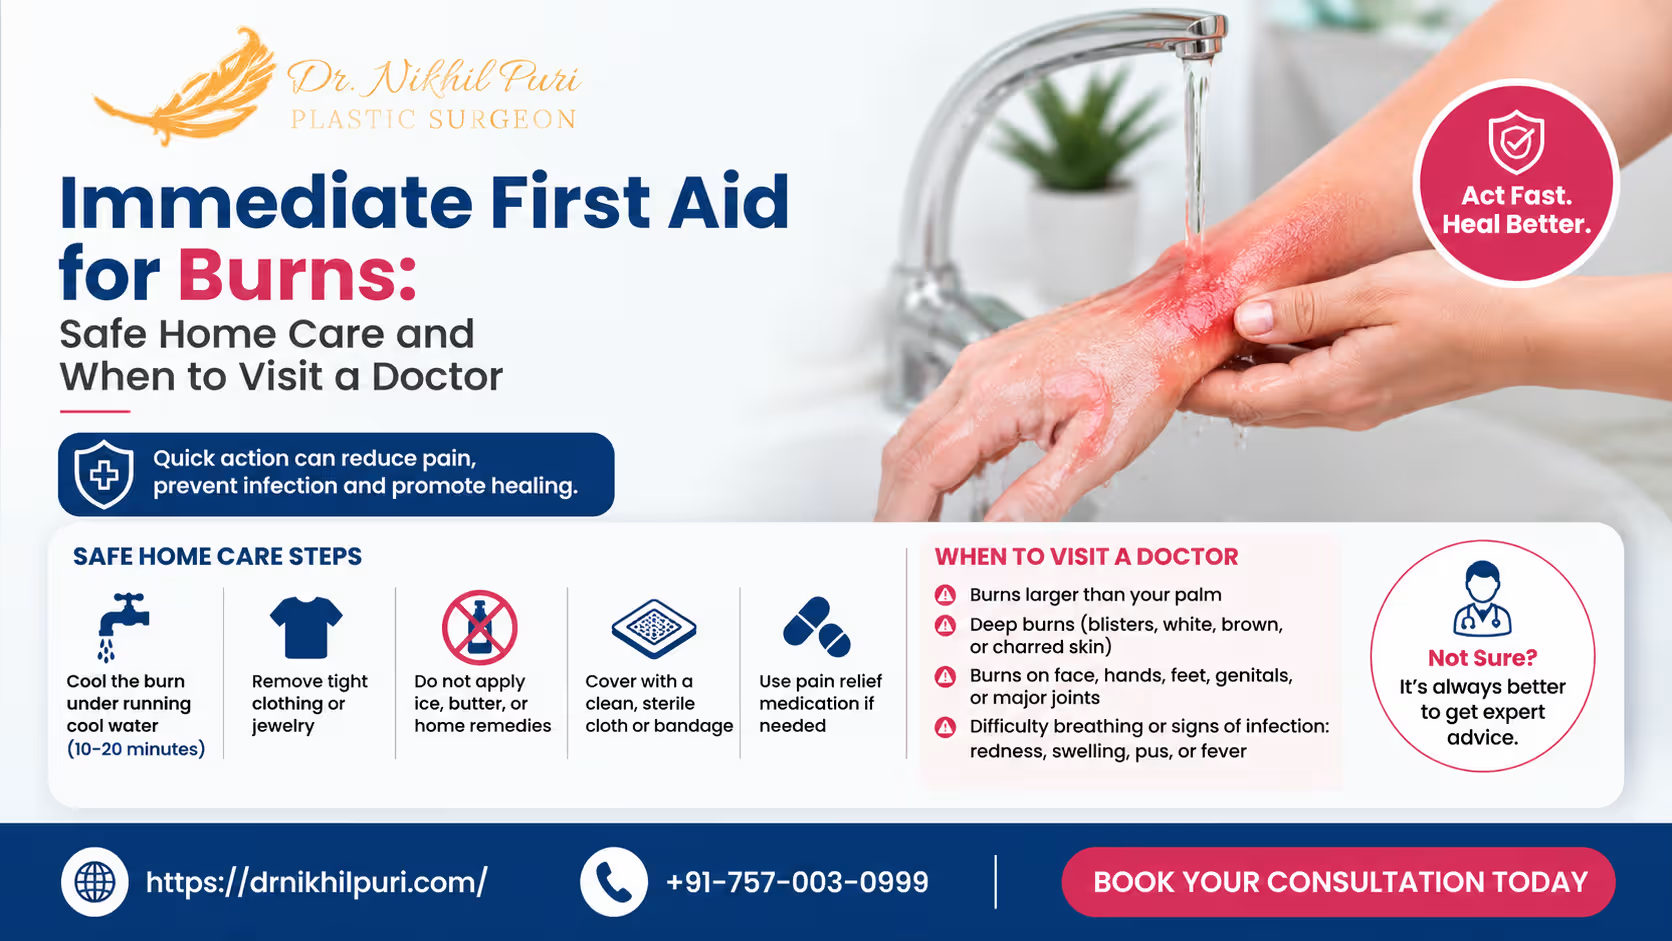
To provide effective first aid for burns, immediately cool the area under running water for 10–20 minutes, remove tight clothing or jewelry near the injury, and cover the area with a clean cloth or sterile dressing. Avoid applying ice, toothpaste, butter, or oils directly on the skin. Severe burns, electrical burns, or deep skin damage require immediate medical attention.
A burn injury happens in the blink of an eye, but the actions you take in the first ten minutes can determine the next ten months of your recovery. Whether it’s a splash of hot oil in the kitchen, a steam scald from a kettle, or a more serious electrical mishap, knowing exactly how to administer first aid for burns—and more importantly, what not to do—is the difference between a minor scar and a life-altering complication.
As an expert in reconstructive and plastic surgery, Dr. Nikhil Puri has seen countless patients whose initial injuries were worsened by well-intentioned but dangerous home remedies. The internet is flooded with “hacks” like using toothpaste or butter to soothe a burn, but from a clinical perspective, these methods can trap heat, introduce bacteria, and deepen the tissue damage.
This comprehensive guide is designed to provide you with medically accurate, step-by-step instructions on first aid for burns. We will explore how to identify burn severity, debunk common myths, and outline exactly when you need to stop home care and seek professional medical expertise.
Understanding Different Types of Burns: The Degrees of Damage
Before you can treat a burn, you must understand the depth of the injury. In plastic and reconstructive surgery, we categorize burns based on how many layers of skin and the underlying tissue are affected.
First-Degree Burns (Superficial)
These are the most common household injuries, similar to a mild sunburn. Only the outermost layer of skin (the epidermis) is affected.
-
Symptoms: Redness, mild swelling, and pain.
-
Skin Appearance: Dry, no blisters.
-
Healing Time: Usually 3 to 6 days.
Second-Degree Burns (Partial Thickness)
These burns penetrate the epidermis and reach the second layer of skin, the dermis. This is where most complications arise if not handled correctly.
-
Symptoms: Intense pain, significant swelling, and redness.
-
Skin Appearance: Presence of blisters, often weeping or moist.
-
Healing Time: 2 to 3 weeks, with a risk of scarring.
Third-Degree Burns (Full Thickness)
This is a medical emergency. The damage extends through all layers of the skin and may affect underlying fat, muscle, or bone.
-
Symptoms: Surprisingly, these may be painless because the nerve endings have been destroyed.
-
Skin Appearance: The area may look white, waxy, charred, or leathery.
-
Healing Time: Requires professional medical intervention, often involving skin grafts or reconstructive surgery.
Step-by-Step First Aid for Burns: The Emergency Protocol

When a burn occurs, the “burning” process doesn’t stop just because you’ve moved away from the heat source. The skin retains heat, which continues to cook the underlying tissue. This is why immediate cooling is vital.
Step 1: Move Away from the Heat Source
Before helping the victim (or yourself), ensure the area is safe. Turn off the stove, disconnect the power (for electrical burns), or wash away the chemical.
Step 2: Cool the Burn Immediately
Place the burned area under cool (not cold) running tap water for at least 10 to 20 minutes.
-
Why? This dissipates the heat and stops the “conduction” of the burn deeper into your skin layers.
-
Note: Do not use ice or ice-cold water, as this can cause frostbite and restrict blood flow, worsening the damage.
Step 3: Remove Tight Jewelry or Clothing
Burns cause rapid swelling. Carefully remove rings, bracelets, or tight clothing near the injury site before the area begins to expand.
-
Caution: If clothing is stuck to the burn, do not pull it off. Cut around it and seek medical help.
Step 4: Avoid Touching or Popping Blisters
A blister is nature’s sterile bandage. Breaking it exposes raw tissue to the environment, significantly increasing the risk of infection. If a blister pops on its own, clean the area gently with mild soap and water.
Step 5: Cover the Burn Loosely
Use a sterile gauze bandage or a clean, lint-free cloth. Wrap it loosely to avoid putting pressure on the burned skin.
-
Pro Tip: In an emergency, clean plastic wrap (cling film) can be used to cover a burn after it has been cooled. It protects nerve endings from air, reducing pain, and doesn’t stick to the wound.
Step 6: Stay Hydrated and Manage Pain
Large burns can cause fluid loss. Drink water and use over-the-counter pain relievers like ibuprofen or paracetamol if necessary.
Burn Severity Guide: When to Stay Home vs. See a Doctor
| Burn Type | Common Symptoms | Action Needed |
| First-Degree | Redness, mild stinging, no blisters. | Home care usually heals on its own. |
| Second-Degree (Small) | Blisters, localized pain, under 2-3 inches. | Home care with sterile dressing; monitor for infection. |
| Second-Degree (Large) | Blisters on face, hands, joints, or larger than 3 inches. | Visit a Doctor/Specialist. |
| Third-Degree | Charred skin, white/waxy look, numbness. | Emergency Room Immediately. |
| Electrical/Chemical | May look minor on the surface but causes internal damage. | Emergency Room Immediately. |
Specific Burn Scenarios: Kitchen, Chemicals, and Electricity
Not all burns are created equal. Depending on the source, the first aid protocol may require specific adjustments.
Kitchen Burns (Hot Oil and Steam)
Hot oil is particularly dangerous because it has a higher boiling point than water and “sticks” to the skin.
-
Treatment: Cool with water immediately. If oil is on the clothing, remove the clothing immediately while flushing with water to get the oil away from the skin.
Chemical Burns
Chemicals (like drain cleaners or industrial acids) continue to burn as long as they are on the skin.
-
Treatment: Flush the area with large amounts of running water for at least 20 minutes. If the chemical was a powder, brush it off the skin before rinsing.
Electrical Burns
Electrical burns often have an “entry” and “exit” wound. While the surface might look like a small first-degree burn, the electricity may have damaged internal organs or heart rhythms.
-
Action: Always seek an EKG and medical evaluation for electrical burns, regardless of how they look on the outside.
What NOT to Do After a Burn: Avoiding the “Kitchen Medicine” Trap

This is the most critical section for preventing long-term complications. I often see patients who have used home remedies that turned a manageable injury into a surgical case.
-
Do NOT Use Toothpaste: Toothpaste contains chemicals (like menthol and calcium) that irritate the wound. More importantly, it creates a seal that traps heat inside the skin.
-
Do NOT Use Butter or Oils: Similar to toothpaste, fats like butter or coconut oil insulate the burn, effectively “frying” the tissue further. They also introduce bacteria that lead to infection.
-
Do NOT Use Ice Directly: Ice causes “cold burns” (vasoconstriction), which cuts off the blood supply the skin needs to heal.
-
Do NOT Use Cotton Wool: The fibers from cotton balls or fluffy towels will stick to the raw wound, making dressing changes agonizing and increasing the risk of infection.
-
Do NOT Use Egg Whites: This is an old wives’ tale that introduces salmonella and other bacteria into an open wound.
Burn First Aid Myths Debunked
Myth: “If it doesn’t hurt, it isn’t serious.”
Fact: The most serious burns (third-degree) are often painless because the nerves have been destroyed. Lack of pain is a major red flag.
Myth: “Vinegar helps take the sting out of a burn.”
Fact: Vinegar is an acid. Applying acid to an already damaged skin barrier will cause further chemical irritation and pain.
Myth: “You should put a bandage on as tightly as possible.”
Fact: Burns swell. A tight bandage can cut off circulation (compartment syndrome), leading to tissue death. Keep it loose.
Safe Home Care for Minor Burns
If you have determined that your burn is a minor first-degree or a small second-degree injury, you can manage it at home with these steps:
-
Cleaning: Gently wash with mild, fragrance-free soap and cool water once a day. Do not scrub.
-
Ointments: Once the burn is cooled, you can apply a thin layer of antibiotic ointment (like Bacitracin) or pure petroleum jelly (Vaseline) to keep the area moist.
-
Dressings: Use a non-stick sterile pad (Telfa). Change the dressing daily or whenever it becomes wet or dirty.
-
Hydration: Skin healing requires significant metabolic energy. Drink plenty of water and eat protein-rich foods to support tissue repair.
Signs a Burn Needs Immediate Medical Attention
Even if you start with home care, you must monitor the site for “red flags.” As a specialist, I recommend consulting a doctor—or specifically a reconstructive surgeon like Dr. Nikhil Puri—if you notice any of the following:
-
Location: Burns on the face, hands, feet, genitals, or over major joints (like the knee or elbow). These areas are prone to functional impairment and scarring.
-
Size: Any burn larger than the palm of the victim’s hand.
-
Infection Signs:
-
Increased pain or swelling after 24 hours.
-
Pus or foul-smelling discharge.
-
Red streaks leading away from the burn.
-
Fever or chills.
-
-
Inhalation Injury: If the burn occurred in a fire, watch for difficulty breathing, soot in the saliva, or a hoarse voice.
-
Non-Healing: If a minor burn shows no signs of improvement after 7 to 10 days.
Patients consulting specialists like Dr. Nikhil Puri for serious burns may require advanced wound care, specialized dressings, or reconstructive treatment to ensure the skin retains its elasticity and function.
Can Burns Leave Permanent Scars? (The Surgeon’s Insight)
The question I am asked most frequently is: “Will this leave a scar?”
Scarring depends on two things: Depth and Time to heal.
-
If a burn heals within 10–14 days, the risk of significant scarring is low.
-
If it takes longer than 21 days to heal, some degree of hypertrophic (raised) scarring is almost certain.
How to Prevent Burn Scars:
-
Keep it Moist: A dry wound is a slow-healing wound. Use prescribed ointments to prevent scabbing.
-
Sun Protection: New skin is highly sensitive. For at least one year after the injury, keep the scarred area covered or use SPF 50. UV exposure will cause permanent dark discoloration (hyperpigmentation).
-
Massage: Once the wound is fully closed, gently massaging the area with moisturizer can help break up collagen bundles that form scars.
-
Silicone Sheets: Medical-grade silicone gel or sheets are the gold standard for flattening and fading burn scars.
Real-Life Case Example: Scald Management
Consider a patient, “Sarah,” who spilled boiling tea on her forearm.
-
Scenario A (Incorrect First Aid): Sarah immediately applied ice and then smeared toothpaste on the area. The ice caused further tissue damage, and the toothpaste hardened, trapping the heat. By the time she saw a doctor two days later, a simple second-degree burn had become infected and deepened, requiring a longer recovery and leaving a noticeable scar.
-
Scenario B (Correct First Aid): Sarah ran cool tap water over her arm for 15 minutes. She removed her watch. She covered the blisters with a loose, clean cloth. The burn healed in 12 days with minimal redness and no permanent scarring.
The Lesson: The first 15 minutes dictated the outcome of her skin’s health for years to come.
Burn Healing Timeline: What to Expect
-
Day 1–2: The “Inflammatory Phase.” The area will be red, painful, and may blister.
-
Day 3–7: The “Proliferative Phase.” The body begins building new skin cells. You may notice itching—this is a sign of healing. Do not scratch.
-
Week 2–4: The new skin will be pink and thin. This is the most delicate stage where scar prevention is key.
-
Month 1–12: The “Remodeling Phase.” The scar will gradually fade from pink to a color closer to your natural skin tone.
How to Prevent Burns at Home: Education is the Best First Aid
Prevention is always better than reconstructive surgery.
-
Kitchen Safety: Turn pot handles toward the back of the stove. Keep a fire extinguisher in the kitchen.
-
Water Heater Temp: Set your home water heater to no higher than 120°F (48°C) to prevent accidental scalds in the shower.
-
Childproofing: Keep electrical cords out of reach and cover outlets. Children’s skin is much thinner and burns more deeply and quickly than adult skin.
-
Chemical Storage: Store cleaners in original containers with clear labels, and always wear gloves when using them.
Final Thoughts
Burns are painful and frightening, but clear-headed action can mitigate the damage. Remember the core principles of first aid for burns: Cool, Remove, Cover. Avoid the temptation to use kitchen remedies, and never underestimate a burn that covers a large area or looks “different” (charred or white).
Administering correct first aid for burns in the first few minutes can significantly improve healing and reduce complications. Avoiding common myths and knowing when to seek medical care is essential for preventing infection, skin damage, and permanent scarring. Early intervention by a professional ensures that functional movement is preserved and aesthetic outcomes are optimized.
Consulting experienced specialists like Dr. Nikhil Puri can help patients receive professional first aid for burns, advanced wound healing support, and long-term scar treatment guidance. Whether you are dealing with a fresh injury or an old burn scar that limits your confidence or movement, expert reconstructive care is available.
Frequently Asked Questions
1. What is the very first thing I should do after a burn?
Immediately place the burn under cool, running tap water for 10 to 20 minutes. This stops the heat from continuing to damage your skin.
2. Should I use ice to cool a burn?
No. Ice can cause further damage to the skin tissue (frostbite) and restrict blood flow, which hinders the healing process. Stick to cool running water.
3. Why is toothpaste harmful for burns?
Toothpaste contains irritants and creates a thick seal over the wound. This traps the heat inside the skin and increases the risk of infection, often making the burn deeper than it originally was.
4. When should I visit a doctor for a burn?
Seek medical help if the burn is larger than your palm, is located on the face, hands, or joints, is a third-degree burn (charred/white), or was caused by electricity or chemicals.
5. Can burns leave permanent scars?
Yes, especially if they are deep (second or third-degree) or if they become infected. Proper first aid, keeping the wound moist, and using sun protection can significantly reduce the risk of permanent scarring.
Disclaimer: This article is for educational purposes only and does not replace professional medical advice. In the event of a severe burn or emergency, call your local emergency services immediately.